Open VSCode Server Offline Deployment for NodeJs Development
Table of Contents
UPDATE 1:
open-vscode server now does a lot of online checks that prevent a good amount of functionalities from working offline. there is another project called code-server that does not have that issue.
I will be creating a blog post for it sometime soon on how to configure it for an offline environment. Though generally, it’s similar to this one, but with different directories locations.
Introduction
Working in offline environments is really difficult nowadays with almost everything connected to the internet. This is especially true with development, whether it is with Node or Python as they most probably require an online package repository to download their packages from.
On top of that, you might be restricted from installing executables, and you will be stuck with windows default applications like notepad to do your coding. This is not an ideal environment for a developer.
The solution to work around these limitations is the newly introduced openvscode-server by gitpod.
Pre-Requisites
Now, this solution will highly depend on docker. So on both of our offline and online environments, we will need:
Solution Flow
We need to be solving 3 main problems when developing in an offline environment with vscode.
- vscode extensions
- Language Runtime Environment (NodeJs)
- Dependencies (NPM/Yarn)
In order to solve those problems, we will need to follow this flow:
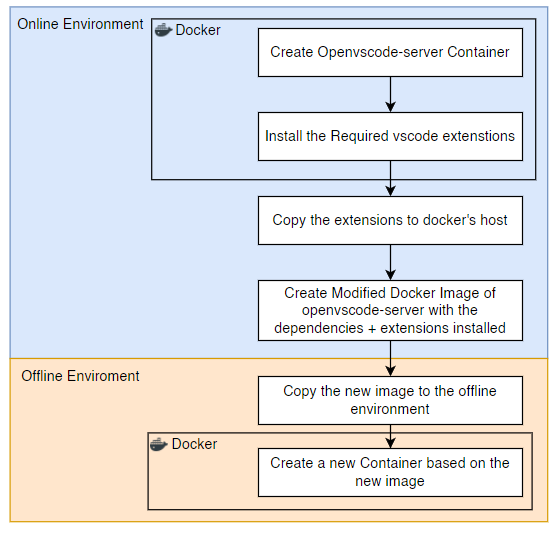
Before going into the solution, we need to understand how it flows from a theoretical standpoint to understand how we are solving each problem.
vscode extensions
Since we won’t have any access to vscode’s marketplace in our offline environment, then we will need to install them in an online environment first and copy those extensions to a customized docker image.
lanuage compiler/runtime
For NodeJs development, we will need to install node, npm, and yarn.
dependencies
We will have to install the dependencies of our node project during the process of creating our docker image.
Deploy openvscode with docker
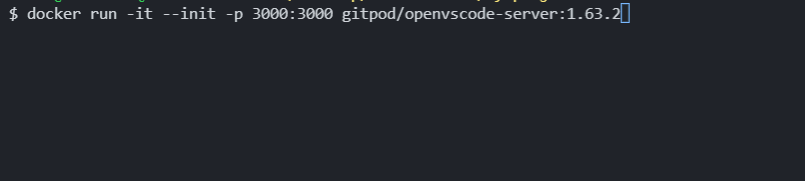
In our online environment, we will run an openvscode-server docker container first
docker run -it --init -p 3000:3000 gitpod/openvscode-server:1.63.2
Make sure to specify the version you are deploying, as this is important for the vscode extensions compatibility. As of writing this blog post, 1.63.2 is the latest version. To check the more recent versions in the future, you can visit the tags section of the image on dockerhub.
once you have it deployed, you need to check the container’s logs to get the security token. Running the earlier command will print out that log into your shell.
Once we have it copied, we will access openvscode server with the port we exposed, and passing the token as a URL parameter:
http://localhost:3000/?tkn=YOUR_TOKEN_HERE
And we can now view our web-based self-hosted vs code!
Install vscode extensions
The next part is to install the extensions we usually use with vscode. This step is up to you as each person has their own preferences.
The thing you should take note of here is that we are using a specific version of openvscode, and the extensions we are going to install will be mainly compatible to that version. Make sure that when you install more extensions in the future that you use the same version of openvscode to ensure the extensions that you downloaded will work.
A note about gitpod’s openvscode-server’s extensions
You may have noticed that the extensions marketplace looked odd, with the ratings being less than how you’d usually remember them to be. This is because gitpod used open vsx registry as their marketplace. code-server, a project similar to gitpod’s openvscode-server details the reasoning behind it. Long story short, it’s due to Microsoft’s Term of Service.
Marketplace Offerings are intended for use only with Visual Studio Products and Services, and you may only install and use Marketplace Offerings with Visual Studio Products and Services.
You can also use the extensions from the official marketplace with gitpod’s openvscode-server. But what you need to make sure of is the version of vscode is the same one as gitpo’s openvscode-server.
Copy The installed vscode extensions to the host
the plugins that we installed will be in this directory in our container:
/home/workspace/.vscode-server/extensions
what we will need to do is to copy those extensions from our docker container to our host.
first, we need to find the container id
docker ps

once we do, we will copy the extensions to our host.
docker cp containerId:/home/workspace/.vscode-remote/extensions .
and now in our host, we will have the extensions directory that has all of the extensions that we installed.

Create a customized Open VSCode server Image for offline deployment
Now in a single directory, we will have the extensions that we just copied from the container, the Node Project we want to move to the offline environment, and we will create a dockerfile.

For the project, I created a simple Typescript Express app that gives me a simple HTML “hello” page:
import express from 'express';
const server = express();

server.get('/', (req, res) => {
  return res.send('<h1>hello</h1>');
});

server.listen('3000', () => {
  console.log('🚀 server started at port 3000');
});

in the dockerfile, we will have the following configuration:
FROM gitpod/openvscode-server:1.62.3
# copy the extensions we installed to the image
COPY  --chown=openvscode-server:openvscode-server  ./extensions/ /home/workspace/.vscode-remote/extensions/
COPY --chown=openvscode-server:openvscode-server ./my-project/ /home/workspace/repos/my-project/
RUN sudo apt update
RUN sudo apt install -y curl
# update the packages list
RUN sudo curl -fsSL https://deb.nodesource.com/setup_16.x | sudo bash -
# install the packages
RUN sudo apt install -y nodejs
RUN sudo npm install -g yarn
# install the dependencies of our project
WORKDIR /home/workspace/repos/my-project
RUN yarn
# run it in another port because react uses port 3000 by default
ENTRYPOINT exec ${OPENVSCODE_SERVER_ROOT}/server.sh --port 9876 "${@}" --
Dockerfile Explanation
let us walk through what we are doing with each part.
FROM gitpod/openvscode-server:1.62.3
means we are using gitpod/openvscode-server:1.62.3 as our base for this image, and we will build on top of it.
COPY --chown=openvscode-server:openvscode-server ./extensions/ /home/workspace/.vscode-remote/extensions/
here, we are copying the extensions directory from our host to the new image’s extensions path. It’s the same path that we got the installated extensions from our running instance.
we added the --chown=openvscode-server:openvscode-server argument to make sure that the ownership is given to the user openvscode-server, which is the user that uses openvscode-server. if the extensions directory (or its contents) changed to another user (like root), then openvscode-server will fail to load the extensions.
COPY --chown=openvscode-server:openvscode-server ./my-project/ /home/workspace/repos/my-project/
and here, we are copying the node project directory to the image.
Our base image gitpod/openvscode-server:1.62.3 already has /home/workspace directory, and with our COPY command, we are creating the directories repo and my-project, then copying our host my-project directory to our image.
RUN sudo apt update
openvscode-server image is based on ubuntu:18.04 image. With that in mind, it means we can install our packages through the apt command.
Before we do so, we will need to update our repository list first, since the ubuntu image is as bare bones as possible, and it wouldn’t have a list of the most recent available versions of the packages.
RUN sudo apt install -y curl
we’ll be installing curl, as we need that to install NodeJs.
RUN sudo curl -fsSL <https://deb.nodesource.com/setup_16.x> | sudo bash -
This command will let us install NodeJs v16’s repository into our apt sources. We are doing this because the apt repository is not updated to have the most recent versions of NodeJs.
Note that we are installing v16 in this tutorial, which is LTS as of writing this Post. This may change in the future, and you can find which repository to add from here.
RUN sudo apt install -y nodejs
RUN sudo npm install -g yarn
these commands should be self-explanatory for a NodeJs developer. We are installing NodeJs, NPM and Yarn. when installing NodeJs from the repository that we added, it will install NPM with it.
WORKDIR /home/workspace/repos/my-project
RUN yarn
we can then change our working directory to where we copied our project, and install the dependencies. You’d be using npm install if you were using NPM here. WORKDIR is somewhat similar to cd.
ENTRYPOINT exec ${OPENVSCODE_SERVER_ROOT}/server.sh --port 9876 "${@}" --
Finally, we are modifying the original ENTRYPOINT to change the port openvscode-server will run on in the container.
This is because 3000 is a common port for React for example, and rather than having to change React’s listening port, we will change openvscode-server’s port instead. We are doing it this way because we want the back and forth transition between our online and offline environments to be “seamless”. The goal here is to give a similar experience to when developing in an online environment, without the need to re-configure our project.
Creating the Image
with our dockerfile ready, we will type the following command at the same location of the dockerfile:
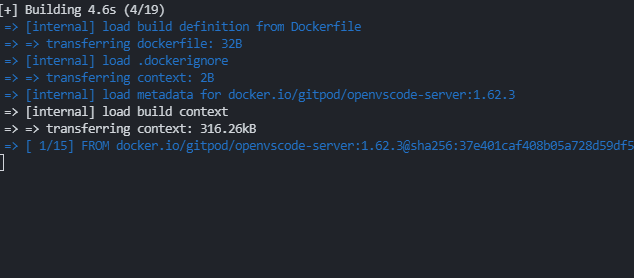
docker build . -t my_organization/openvscode-server:1.62.3
and this will build our image with the tag we just gave it.
Moving the Docker Image to an Offline Environment
Save the Docker Image
to save the docker image, we can use following command:
docker save my_organization/openvscode-server:1.62.3 -o openvscode-server-1-62-3.tar
after we get the image exported to the tar file, we will then copy it to our offline environment
Loading the docker image
in our offline environment, we will load our docker image with this command:
docker load -i openvscode-server-1-62-3.tar
Running the Container in the Offline Environment
From there, we can finally get our container started with the image that we created, and it should work right away.
we will create a docker-compose.yml file:
version: '3'
services:
  code:
    image: my_organization/openvscode-server:1.62.3
    volumes:
      - workspace:/home/workspace
    ports:
      - 3000:3000 # our express app
      - 9876:9876 # our openvscode-server

volumes:
  workspace:
and run:
docker-compose up -d
since we are using the -d argument, we will not be able to see the logs of the container. To do so, we will first get the ID of the container:
docker ps

then inspect the logs:
docker logs CONTAINER_ID

and that’s it! our offline development environment should be working properly from here!
we can test out our node express app, and it will be able to run it properly!
we can then visit the page from the port we routed it to, and we will see our “hello” page there as well.
Limitations
This solution is to get you up and ready for offline development quickly. Though, am sure you can tell that there are a few limitations.
- No offline package repositories for NPM/Yran
- This means that removing
/node_modulesfor a node project is dangerous, and we won’t be able to restore it. Unless we deploy a new container and copy it over. - We can’t really install additional packages in the offline environment
- This means that removing
- The Exposed Ports will quickly conflict and/or get out of hand if we have multiple developers.
- A developer running react would usually use port 3000. We can always map different ports for each developer, but this can get tedious as they might need more ports.
These limitations luckily have solutions for them, and we will be discussing them later in the future.
Conclusion
Offline environments are a huge obstacle for developers, and overcoming them can be a daunting task. The power of docker and gitpod’s openvscode have greatly simplified preparing a development environment very quickly.
Thank you very much. It was very helpful. It took a while but after a few missteps I got it working. Is ‘home/workspace/’ a Linux directory? I did it on a Mac. It worked but opening a project was a little difficult so I cloned one from Github to get started. Also, don’t you need to add ‘-f’ and the filename in the docker build step? I used this: “docker build . -f openserver.docker.txt -t openvscode-server:1.62.3” (in the same directory where the extensions were saved.)
Hey Darren!
I’m glad that it helped!
`home/workspace` is indeed a Linux directory. open vscode server is built on top of an Ubuntu container.
the `-f` argument is only needed when you want to target a specific file for docker to read from to create an image.
By default, `docker build` will look for a file named `dockerfile` to get the build configuration from.
the `.` in `docker build .` means “look for the `dockerfile` file here, in where I just ran the command”.
`-f` can be used if you are using a file that is not named `dockerfile`, like in your case. It’s useful when you have multiple files with docker images configurations, and you’d want to use a specific one.